

Introduction
Global-e’s Shipping API provides merchants with fully integrated shipping capabilities to get the relevant shipping labels and documentation to ship straight from their warehouses or through a 3PL. For this purpose, the integration is based on implementing the Global-e shipping solution akin to a simplified carrier integration. This API works seamlessly across Global-e direct integrations and Managed Markets merchants. This document describes the implementation of the API calls required to perform the necessary shipping activities.Shipping Model Scenarios
To fulfil a cross-border order, use the Global-e APIs to generate shipping documents, including labels and commercial invoices. This ensures accurate and compliant documentation for the shipment, enabling a duty guarantee. Global-e supports the following document and document formats:- Shipping labels in 6x4 format, available in PDF/ZPL/EPL for specific UK carriers.
- Commercial Invoices in 8.5x11 inch letter size or A4 format, provided only when a carrier and country do not support Paperless Trading (PLT).
Integration Overview
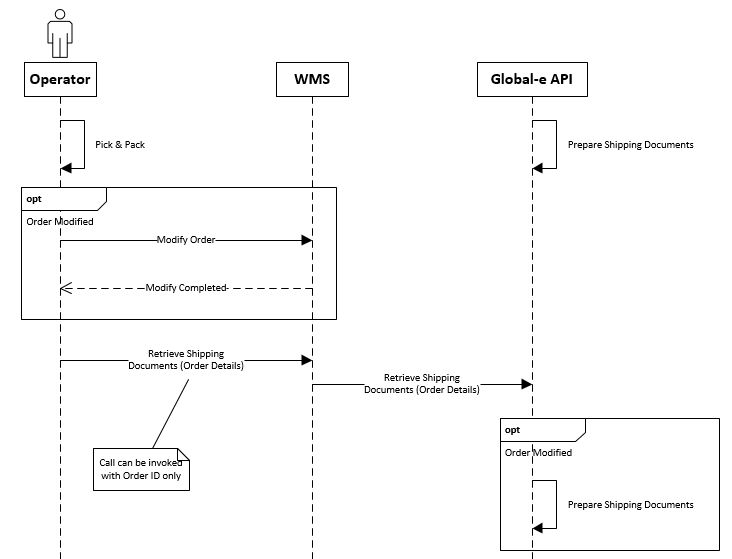
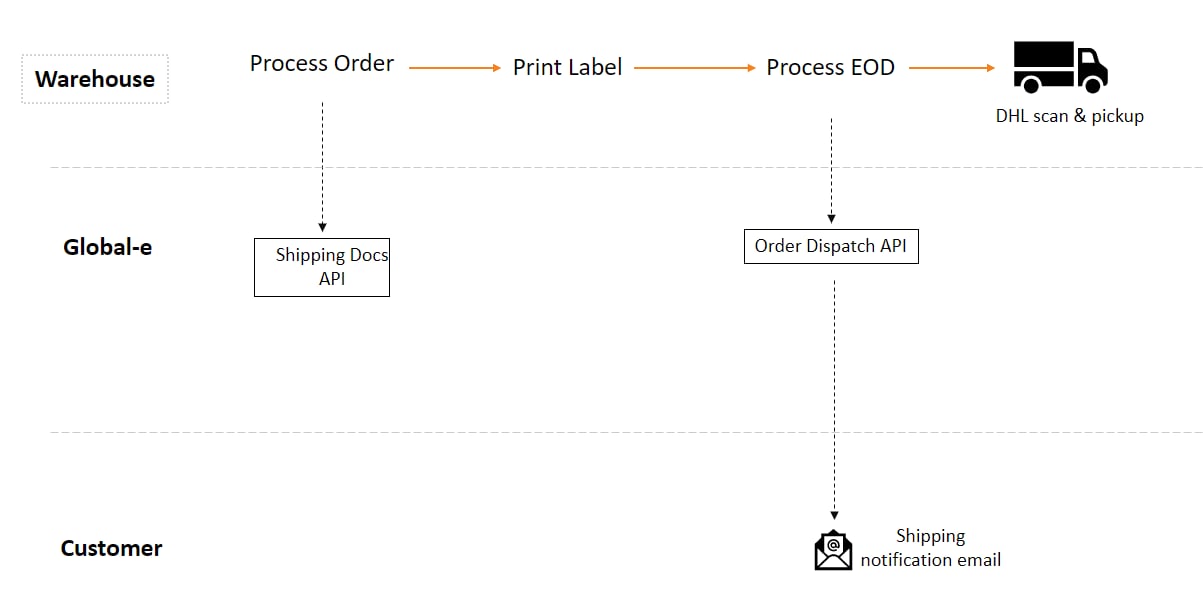
Ensuring an accurate description of the shipment contents on both the label and Commercial Invoice (CI) is crucial to avoid potential overcharges for duties and taxes. The information declared in the API must align with the actual contents of the parcels being shipped. The shipping process and its integration are built based on the following logic:- Receive and identify Global-e operated orders.
- Declare orders fulfilled and ready for dispatch in API call #1.
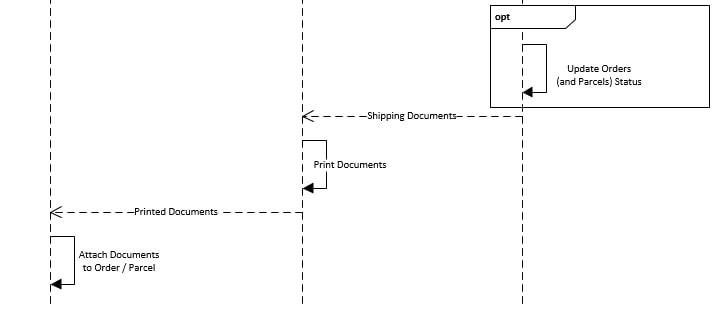
- Retrieve shipping documents as a response to API call #1:
- The carrier label
- The commercial invoice (for non-paperless countries)
- Other documents, such as the Dangerous Goods note
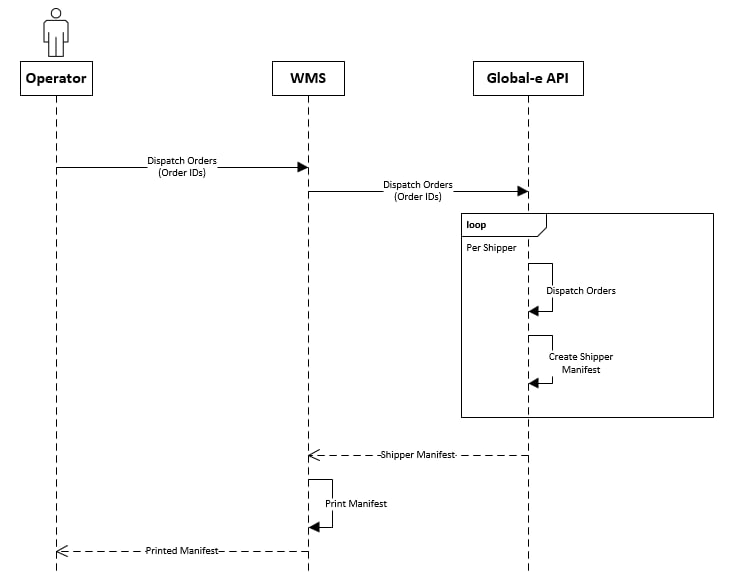
- Declare effective dispatch of orders in API call #2.
- Retrieve the carrier manifest for carrier sign-off as a response to API call #2.
- Declare the fulfilment back to the eCommerce platform.
Declare Order Fulfilment and Retrieve Shipping Documents
Orders Dispatch Notification
Prerequisites
The Merchant Order Management System (OMS) or Warehouse Management System (WMS) should be familiar with and support the following features, either directly or through an escalation process:- Display the complete list of items in the order
- Enable the selection of items for dispatch
Integration Steps
Identify Orders Processed via the Global-e API
You can receive orders directly on your eCommerce platform or via 3rd party integrations. Accordingly, the following scenarios should be supported to associate orders with the Global-e integration to generate shipping documentation: Shipping/Carrier code as provided in the order payload received:- In Shopify’s context, such indication is available via the order
shipping_linescode or title field. Mapping of values presented in these fields should allow mapping orders to the Global-e integration. - Outside Shopify, standard carrier mapping as currently performed should be used.
merchant_of_record_app_id field will be provided. When Global-e is responsible for an order, this value will be set to 2745565185. However, if you are an independent merchant doing this integration, you may choose either of the methods above per your integration.
The merchant_of_record_app_id field is available on Shopify webhooks, RESTful GET Orders calls or GraphQL queries. Version 2022-10 or later of the Shopify API is required for this field to be present.
Both methods should be implemented to comply with different merchant setups in pushing orders to the WMS/3PL.
Orders will arrive via the same channel as all other orders for a merchant. It’s important to map such orders and prevent them from being shipped via means other than Global-e.
Declare Order Fulfilment and Get Documents
From the orders indicated as fulfilled with possible exceptions, the GetShippingDocuments API (POST /Order/GetShippingDocuments) will return the required shipping documentation as a base64 encoded byte array and URL for printing.
GetShippingDocuments — full request & response
Parameters, schema, examples, and the interactive playground for
POST /Order/GetShippingDocuments.- Shipper Name (order level)
- Tracking Number (for each parcel and order level)
- Tracking URL (for each parcel and order level)
ParcelsTracking array by matching the relevant parcel code tracking. If the tracking is done on the order level, the tracking information of the order (Tracking Number and URL) will be populated on the parcel level as well (with the same values).
OrderDocument DocumentTypeCode list
UseDocumentTypeCode to identify the type of document returned by the API and how to print it.
Labels for Zebra/Thermal Printer
A4 / Letter Size for Laser printer
Notify Order Dispatch and Retrieve Carrier Manifest
The DispatchOrders API (POST /Order/DispatchOrders) provides the necessary carrier manifest, encoded as a base64 byte array, and a printing URL for all orders with printed labels since the last DispatchOrders call. Non-Shopify orders are tagged as Dispatched to Customer and set up to send tracking notification emails.
DispatchOrders — full request & response
Parameters, schema, examples, and the interactive playground for
POST /Order/DispatchOrders.Mark the Order Fulfilled
Once a label has been used to ship a set of goods, update the fulfilment state back to the merchant platform to complete the workflow.- Status: Success
- Tracking Company: Use the
ShipperNamereturned by the GetShippingDocuments call - Tracking Number: Use the
ParcelTrackingNumberreturned by the GetShippingDocuments call - Items: Only those items that have shipped with this label should be identified
Use Cases
Examples of request body asUpdateOrderDispatchRequest. Order description for this section: product-A in quantity 1, product-B in quantity 2.
Single Parcel Shipping
Single call:Multi Parcel
Single call:Split Parcels
First call (“day 1”):Country Of Origin, Parcel Weight & Dimensions
When using Global-e Enterprise services for shipping, consult with your account manager about the availability of this feature.
- Product Country of Origin
- Parcel Weight: For Global-e Enterprise, the weight of the products within the parcel is calculated according to the parcel weight with the simple average method. Example: for a parcel weighing 1000 Grams with two items, each item will weigh 500 Grams. The weight is always in Grams in GetShippingDocuments.
- Parcel Dimensions: For Aramex, Global-e provides the parcel dimensions according to the first parcel even for consolidated shipment (in the current implementation, the dimensions exist at the shipment level and not per parcel). The dimensions are always in Centimetres in GetShippingDocuments.
Error Handling
Processing Exception Scenarios
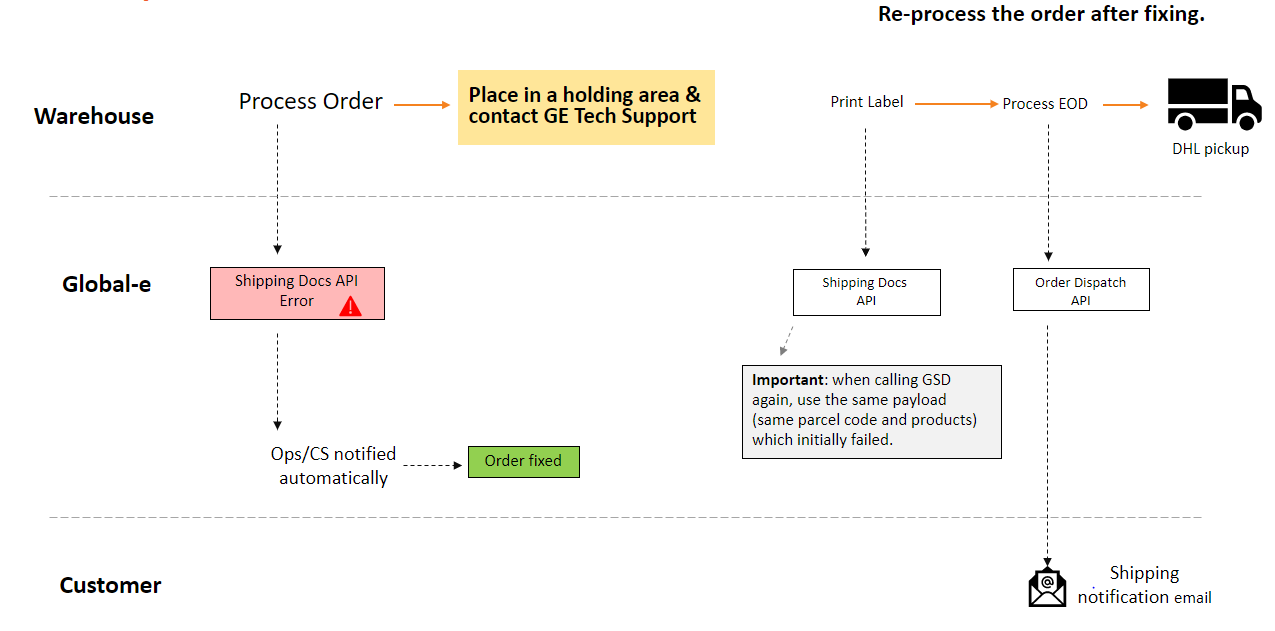
The following diagrams illustrate the processing-exception scenarios.Normal Operation – No issues
With Error Handling
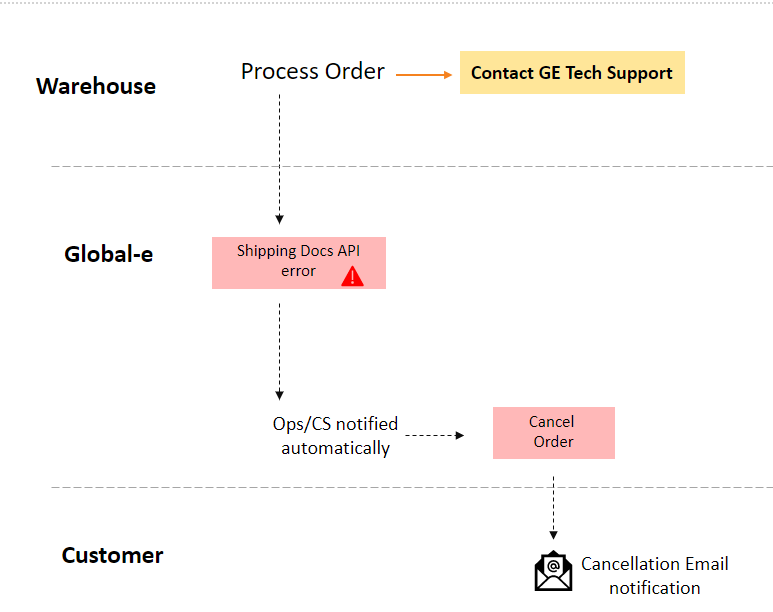
Scenario: Order to be Cancelled after a Failed API request
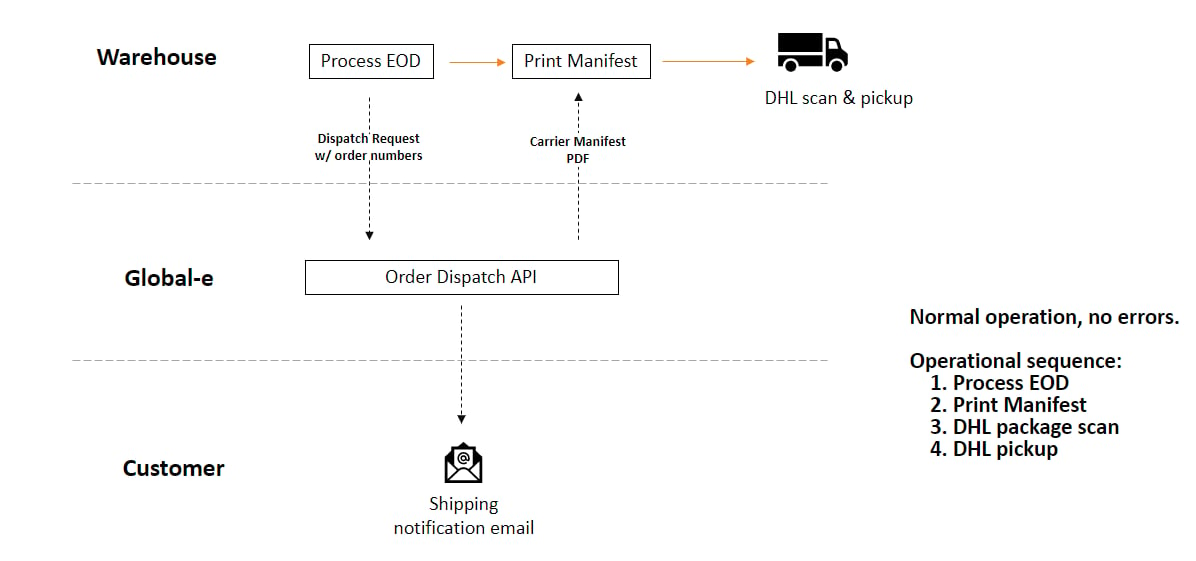
Scenario: End-of-day Manifesting
Scenario: End-of-day Manifesting with Possible Errors
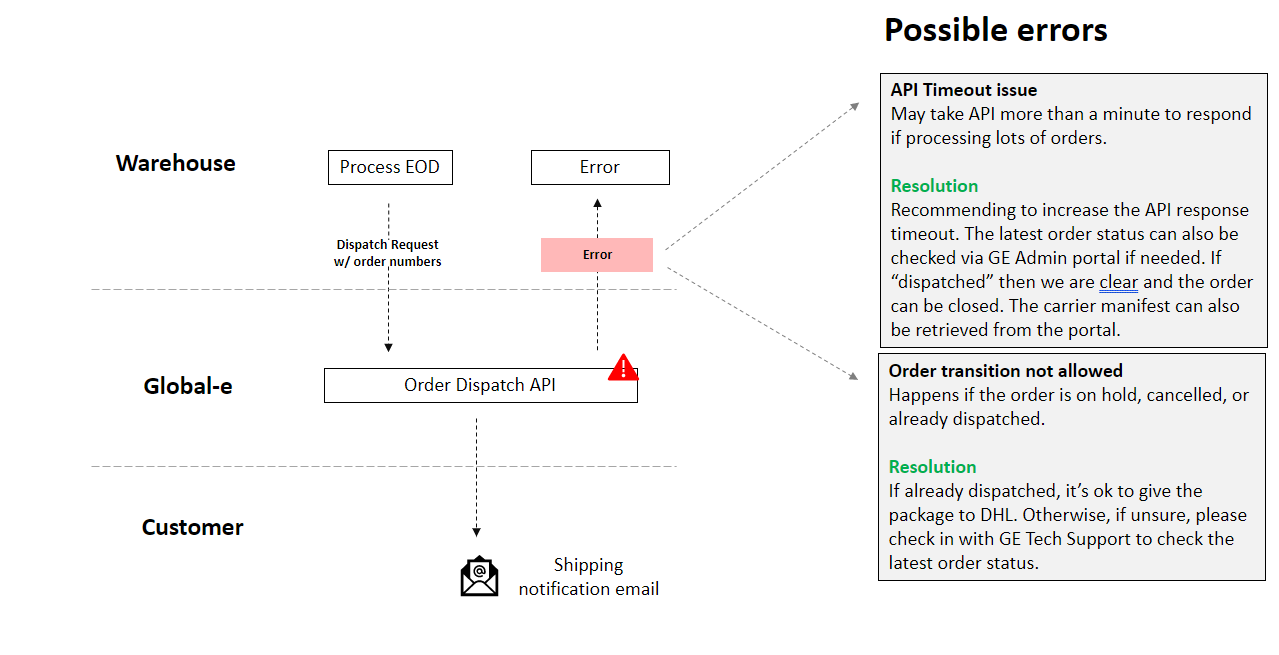
Scenario: End-of-day Manifesting with Possible Errors and Error Handling
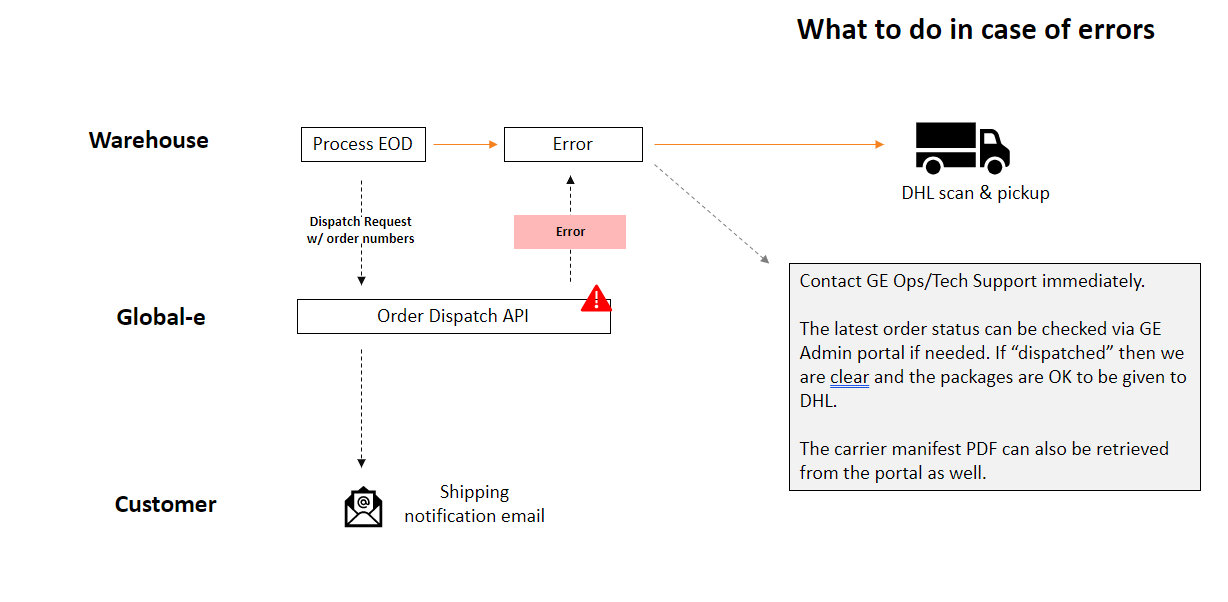
GetShippingDocuments Error Codes
DispatchOrders Error Codes
Void Parcel
If you need to cancel a declared parcel — because you no longer intend to send it, or the shipment requirements changed — use the Void Parcel API. See the Cancelling Declared Parcels page for the full flow, parameters, and error handling.Appendix – Shopify Managed Markets
Testing Shopify Managed Markets Integration
To do an end-to-end test for Managed Markets orders, you need to use a Shopify Shop that has Managed Markets enabled. We recommend you use a separate test shop. You can also reuse an existing test shop by simply enabling Managed Markets.Build a New Shopify Shop
- A new developer shop should be created and connected to your software or warehouse management system.
- This shop should have at least one physical product in its catalogue.
- Set up the location of a USA-based warehouse and allocate products to it so that orders can be placed.
- Enable Shopify Payments.
- Be aware that sandbox shops cannot be promoted to production shops.
Enable Managed Markets
Contact Shopify support. Let them know you are testing an SMP shipping integration, what your shop’s myshopify.com domain is, and some of your existing Shopify merchants. Make it clear you would like to make a sandbox integration — this will allow you to test using test credit cards and test carrier accounts. You should be given access to create an application for Managed Markets. Fill this out to the best of your ability. As this is a sandbox shop, accurate data is not required to be accepted. After creating an application, you will soon get an email indicating that your application has been accepted. Click the link in this email and you will be walked through the process of enabling Managed Markets. You will also receive amerchantGUID from Shopify.
Adding a country picker to your shop template can help streamline the testing of international orders, but is not required.
Testing Managed Markets
- You must place an order via standard checkout and not a draft order, created through Shopify Admin.
- Create a new Incognito window every time you submit a test order to avoid previous addresses being reused in the checkout.
- If you added a country picker, you can select the country you want to test.
- Any physical product may be purchased.
- Provide an accurate country, city, state, and postal code at checkout; name and address can be anything.
- Use the following test credit card data: Card Number
4111 1111 1111 1111, Name: Any Name, Expiration03/2030, CVC737.
Example Test Orders
- Destination France (75001, Paris): This should be a Managed Markets order. Ensure that the label is correct and that a Commercial Invoice (CI) was recorded. The label should print at 4”x6”. France allows Paperless Trading (PLT) and the CI need not be printed.
- Destination Brazil (Rio de Janeiro): This should be a Managed Markets order. Ensure that the label is correct and that a Commercial Invoice (CI) was recorded. The label should print at 4”x6”. Brazil is not a PLT country — the CI should be printed at 8.5”x11”.
- Destination USA (Domestic): This is not a Managed Markets order. Ensure that your standard operations for assigning carriers and printing labels still apply to this order.