> ## Documentation Index
> Fetch the complete documentation index at: https://docs.global-e.com/llms.txt
> Use this file to discover all available pages before exploring further.
# Setting Up Global-E Product Identifiers in Shopify for EU Compliance
Part of the [EU Customs Reform - Product Identifiers (PID)](/eu-product-identifiers-pid), please read for overall regulation context and requirements.
From 1 November 2026 you need to add two pieces of product data in Shopify. Your **SKU** already reaches us and needs no action.
You can provide the data in **either** of these ways (or both):
* **Recommended - Shopify variant Barcodes** - see **Option A** below
* **Alternative if unable to use barcodes - Global-e variant metafields** - see **Option B** below, only used if Shopify barcodes are empty
**Already using the metafields?** You do **not** need to migrate to Barcodes right now. We keep reading the metafields but recommend moving to Shopify new standardised barcode fields in the future.
***
## What you need to provide
For what each identifier is, see [The three identifiers](/eu-product-identifiers-pid#the-three-identifiers) on the overview page.
Data is set **per variant**, not per product. A barcode belongs to a specific sellable item - a size M black t-shirt has a different barcode from a size L. Use product-level fields only if the product has a single variant, or if the value is genuinely identical across every variant.
| What we need | Barcodes type (Option A) | Metafield (Option B) |
| - | - | - |
| **NS-PID** - manufacturer / supplier product code (required) | **NS-PID** (non-standardised product identifier) | `globale.mididentifier` |
| **S-PID** - standardised barcode when you have one. If there is still no S-PID, we treat the product as having no standardised barcode | **GTIN**, **EAN**, **UPC**, or **ISBN** | `globale.standardcode` |
Do not enter placeholder values. Never use NA, N/A, 0, -, a blank space, or similar.
***
Option A - Shopify Barcodes
Shopify lets you add **more than one barcode per variant**, each with a **type**.
Use the **bulk editor**, **CSV**, or **Admin API** to perform changes on multiple products/variants.
In Shopify Admin:
1. Open **Products** → choose a product → open a **variant**.
2. In **Barcodes**, add an entry and choose the type:
* **NS-PID** → for **NS-PID** (manufacturer code, model number, supplier SKU, or your own style code)
* **GTIN**, **EAN**, **UPC**, or **ISBN** → for **S-PID** when you have a real barcode
3. Save the variant.
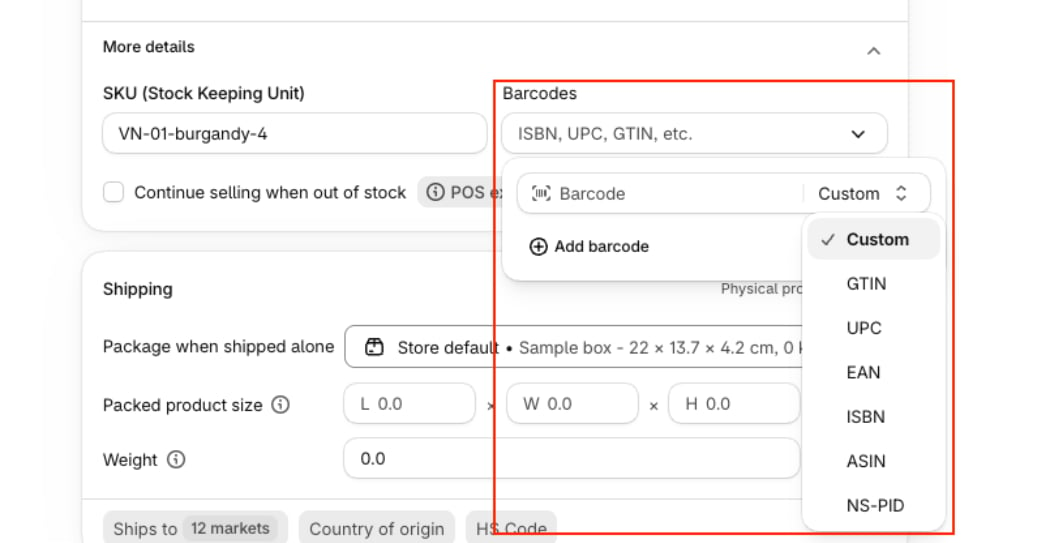 **Legacy single Barcode field:** Shopify is moving that value into **Barcodes**. We can use it where it maps to S-PID. You still need **NS-PID** in **NS-PID**.
**If you already have barcode values on a variant**, Global-e picks your **S-PID** (`standardcode`) from that variant's **Barcodes** list using the first match below.
1. A **Custom** (or untyped) barcode that passes Shopify's **GTIN** format checks
2. The first barcode typed **GTIN**
3. The first barcode typed **EAN**
4. The first barcode typed **UPC**
5. The first barcode typed **ISBN**
6. A **Custom** (or untyped) barcode that did not pass GTIN checks at step 1
***
### What to do - three steps
**Step 1 - Create the two metafield definitions**
Navigate to **Settings → Metafields and metaobjects → Variants → Add definition** and create both of the following.
After entering the metafield name, click `custom.standardcode` to change the namespace:
**Legacy single Barcode field:** Shopify is moving that value into **Barcodes**. We can use it where it maps to S-PID. You still need **NS-PID** in **NS-PID**.
**If you already have barcode values on a variant**, Global-e picks your **S-PID** (`standardcode`) from that variant's **Barcodes** list using the first match below.
1. A **Custom** (or untyped) barcode that passes Shopify's **GTIN** format checks
2. The first barcode typed **GTIN**
3. The first barcode typed **EAN**
4. The first barcode typed **UPC**
5. The first barcode typed **ISBN**
6. A **Custom** (or untyped) barcode that did not pass GTIN checks at step 1
***
### What to do - three steps
**Step 1 - Create the two metafield definitions**
Navigate to **Settings → Metafields and metaobjects → Variants → Add definition** and create both of the following.
After entering the metafield name, click `custom.standardcode` to change the namespace:
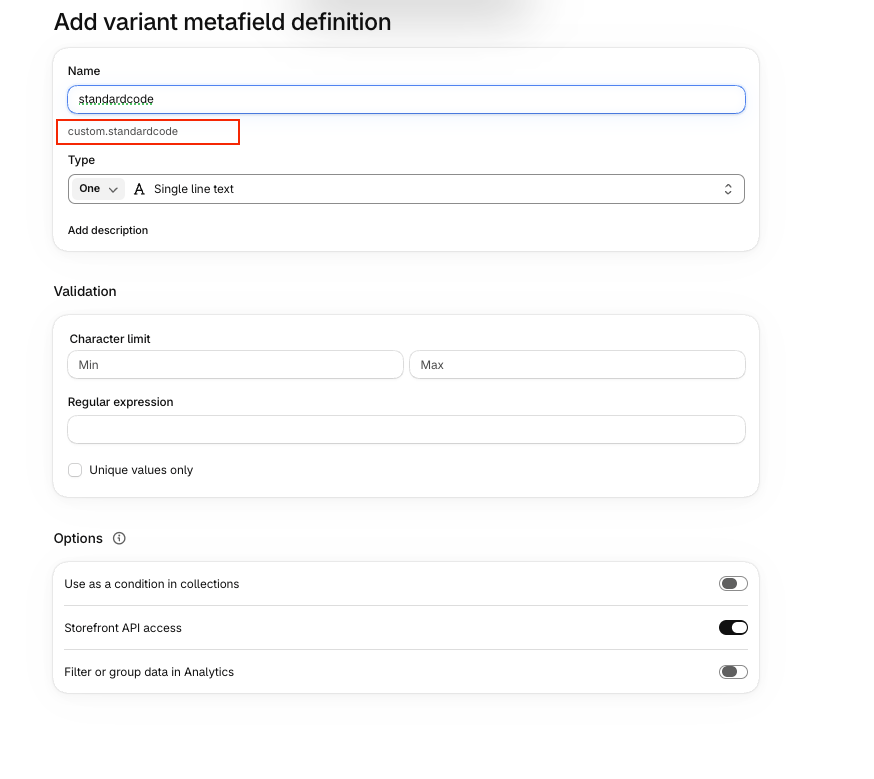 Change the default `custom` namespace to `globale`:
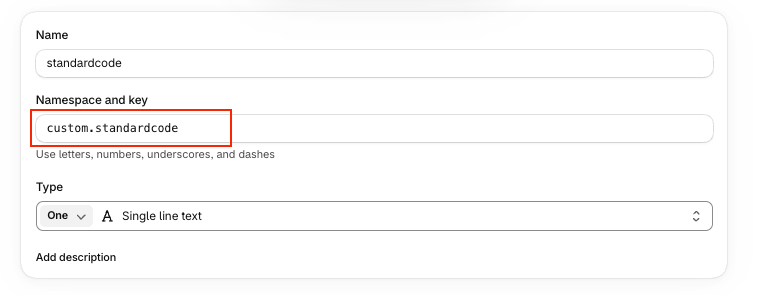 | Name | Namespace and key | Content type |
| - | - | - |
| standardcode | `globale.standardcode` | Single line text |
| mididentifier | `globale.mididentifier` | Single line text |
Enter these exactly as shown. Changing the name, the namespace and key, or the content type will stop Global-e from reading the values, and your orders will be submitted without the identifiers.
**Step 2 - Populate the metafields on your variants**
You can edit values individually, or in bulk using the Shopify bulk editor, a CSV import, or the Admin API.
* `standardcode` - set per variant. It normally differs across sizes and colours.
* `mididentifier` - required on every variant. Often identical across all variants of a product, so it usually bulk-edits cleanly.
**Step 3 - Keep metafields in your product-creation process**
New variants added after go-live will not inherit these values automatically. Re-check coverage after any catalogue migration, PIM change or bulk update.
This documentation is built and hosted on [Mintlify](https://mintlify.com), a developer documentation platform.
| Name | Namespace and key | Content type |
| - | - | - |
| standardcode | `globale.standardcode` | Single line text |
| mididentifier | `globale.mididentifier` | Single line text |
Enter these exactly as shown. Changing the name, the namespace and key, or the content type will stop Global-e from reading the values, and your orders will be submitted without the identifiers.
**Step 2 - Populate the metafields on your variants**
You can edit values individually, or in bulk using the Shopify bulk editor, a CSV import, or the Admin API.
* `standardcode` - set per variant. It normally differs across sizes and colours.
* `mididentifier` - required on every variant. Often identical across all variants of a product, so it usually bulk-edits cleanly.
**Step 3 - Keep metafields in your product-creation process**
New variants added after go-live will not inherit these values automatically. Re-check coverage after any catalogue migration, PIM change or bulk update.
This documentation is built and hosted on [Mintlify](https://mintlify.com), a developer documentation platform.